Category: Uncategorized

  • Automate CI/CD using Fabric APIs

    Fabric REST APIs allow you to automate Fabric procedures and processes, improving efficiency and productivity. REST API stands for Representational State Transfer Programming Application Interface. Azure REST APIs are used to manage and interact with various Azure services.

    Some of the advantages of using the Fabric REST APIs are:

    • Automating repeat processes with consistency, making it easier to perform data processing on an ongoing basis.
    • Seamless integration with other systems and applications, providing a streamlined and efficient data pipeline.

    Fabric CI/CD REST APIs are available for deployment pipelines and Git integration.

    • Deployment pipelines REST APIs
    • Git REST APIs

    Use the Fabric REST APIs for CI/CD to automate processes

    You can use the Fabric CI/CD REST APIs to:

    • Commit the changes made in the workspace to the connected remote branch.
    • Update the workspace with commits pushed to the connected branch.
    • See which items have incoming changes and which items have changes that weren’t yet committed to Git with the Git status API.
    • List Deployment Pipeline Stage Items: Returns the supported items from the workspace assigned to the specified stage of the specified deployment pipeline.
    • Deploy Stage Content: Deploys items from the specified stage of the specified deployment pipeline.

    https://cosmicnext.com/software-development

  • Implement deployment pipelines

    Pipelines enable a continuous integration/continuous deployment (CI/CD) approach that ensures content is updated, tested, and regularly refreshed. Pipelines are a way to automate the movement of content through the development, test, and production stages of the content development lifecycle.

    What are deployment pipelines?

    Fabric deployment pipelines help you deploy your Fabric items across different environments like development, test, and production. They let you develop and test content in Fabric before it reaches end users.

    Create a deployment pipeline

    Deployment pipelines can be created using two different methods:

    • Using the Workspaces icon on the left navigation pane in Fabric.
    • Using the Create deployment pipeline icon at the top of a workspace

    Follow these steps to create a deployment pipeline:

    1. Select the Workspaces icon on the left navigation pane, then Deployment pipelines.
    2. Select New pipeline. Then name the pipeline and select Next.
    3. Define, and name the stages in your pipeline. Then select Create and continue.Screenshot of pipeline stage selector.
    4. Assign a workspace to a stage. Then select the green check mark next to the stage. Then you’re ready to deploy content to the pipeline.Screenshot of workspace assignment interface.

    Deploy content to a pipeline stage

    The deployment process lets you clone content from one stage in the pipeline to another, typically from development to test, and from test to production.

    To deploy content between stages, select the stage to deploy to, and then select the stage in the Deploy from drop-down box, and then select the Deploy button. The deployment process copies all of the workspace content into the target stage. In the following image, there’s a data pipeline that only exists in the development stage that will be moved to the test stage when Deploy is selected in the development stage.

    Screenshot of content deployment interface.

    Use deployment pipelines with Git

    Deployment pipelines can be used with Git branches. This would be used to promote content between development, test, and production environments when content for each environment resides in different Git repositories or branches.

    To use deployment pipelines with Git branches:

    1. Follow the instructions in the section on this page entitled “Create a deployment pipeline” to create a deployment pipeline and assign each stage to a workspace.
    2. Assign each workspace in the deployment pipeline to a Git repository and branch in Git integration in Workspace settings.Screenshot of workspace to Git provider connection interface.
    3. Promote content between staging environments using the deploy button in the pipeline as described in the Deploy content to a pipeline stage section on this page. This moves content between environments in Fabric but the Git repository won’t be updated until you manually update from the workspace.In the image below, the checkmark in the deployment stage box indicates that a data pipeline item exists in all three staging environments of the deployment pipeline in Fabric and that the Fabric stages are synchronized.Screenshot of pipeline before files are synced with Git.When we select Source control from either the Test or Production workspaces that are part of the deployment pipeline, we see that the pipeline hasn’t been synchronized with the Git repository.Screenshot of workspace showing uncommitted items and showing the source control box where files aren't yet synced with Git.
    4. To synchronize the repository with the Test workspace, select the Commit button in the Source control window shown in the preceding image.

    https://cosmicnext.com/school-management

  • Implement version control and Git integration

    To support continuous integration, you frequently merge your code changes into a shared repository. The shared repository is part of a version control system like GitHub or Azure DevOps. Version control is a way of managing changes to code over time. It lets you track code revisions, contribute collaboratively to code development, and revert to prior versions of code if needed.

    GitHub and Azure DevOps are the version control systems that are supported in Fabric. These version control systems allow you to create a copy of a code repository that’s called a branch. You can use the branch to work on your own code independently from the main version of your team’s code. When you have changes to submit, you can commit them to the repository and merge your changes with a main code branch.

    Integration with version control is at the workspace level in Fabric. You can version items you develop within a workspace.

    Connect to a Git Repository

    A Fabric workspace is shared environment that accesses live items. Any changes made directly in the workspace overrides and affect all other workspace users. A best practice is for you to develop in an isolated workspace, outside of a shared, live workspace. In your own protected workspace, you can connect to your own branch and sync content from the live workspace into your protected workspace, and then commit your changes back to your branch or the main branch.

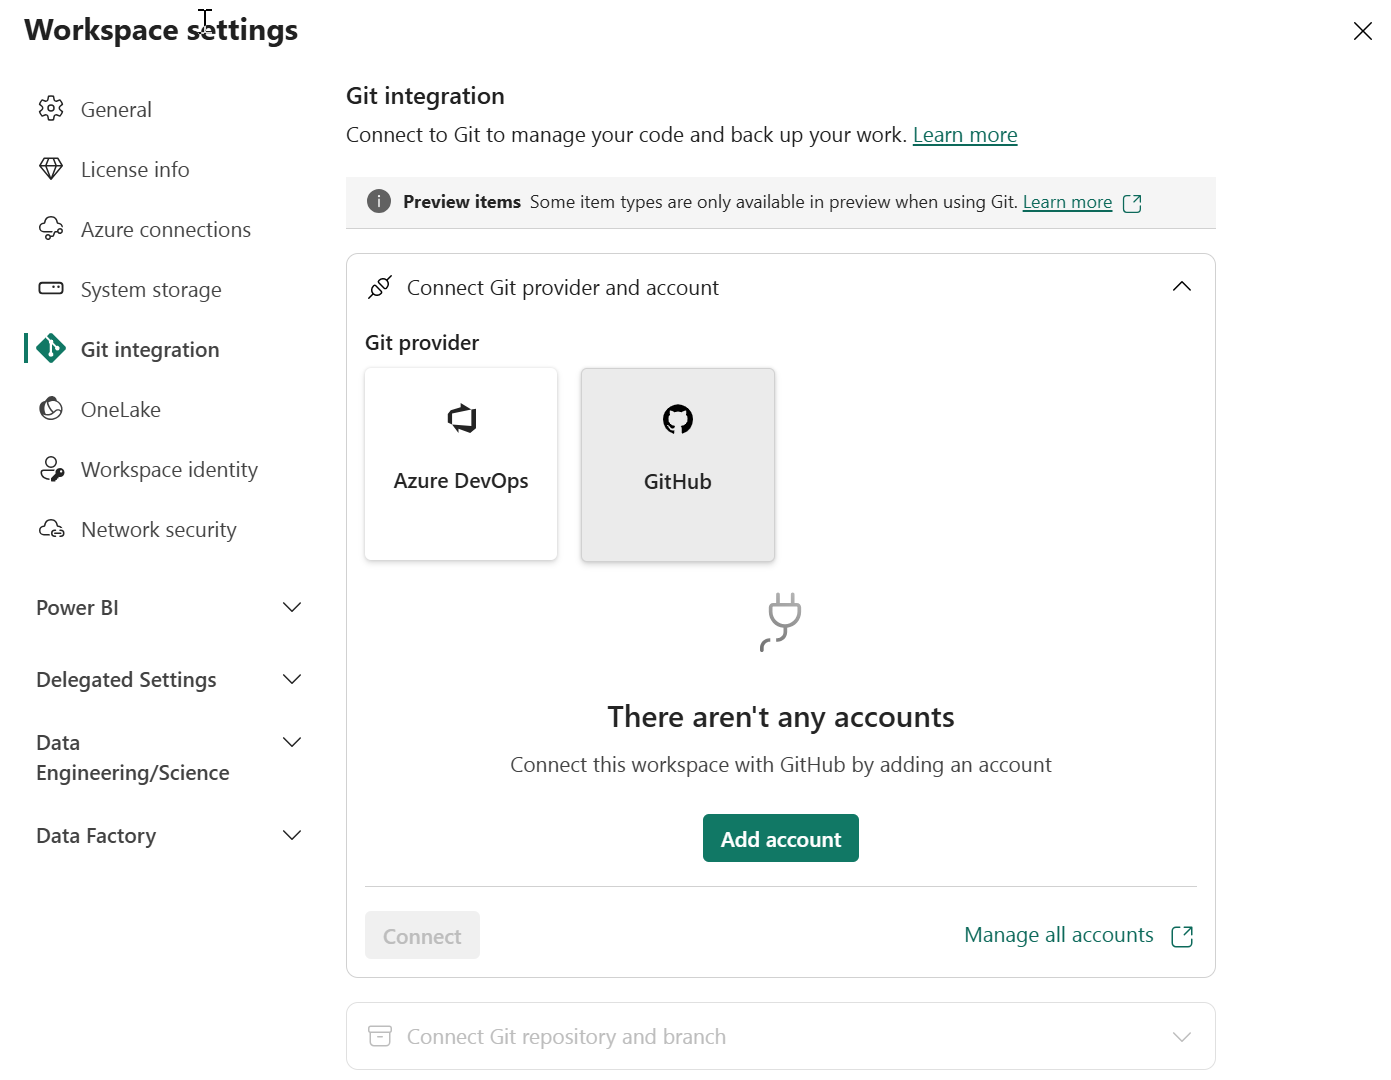
    1. Set up a git repository: The first step in implementing Git integration is to set up a Git repository in either GitHub or Azure DevOps. The repository is the central location for storing and managing items.
    2. Connect a Fabric workspace to a Git repository: Next, within the workspace that you want to connect to your repository, establish a connection to the repository from the Git integration option in workspace settings.Screenshot of workspace to Git provider connection interface.When you connect a workspace to Git, you create or select an existing a Git repository branch to sync with. Fabric syncs the content between the workspace and Git so they have the same content.Screenshot of branch selection in Git provider interface.

    Commit and update the Fabric workspace and Git repository

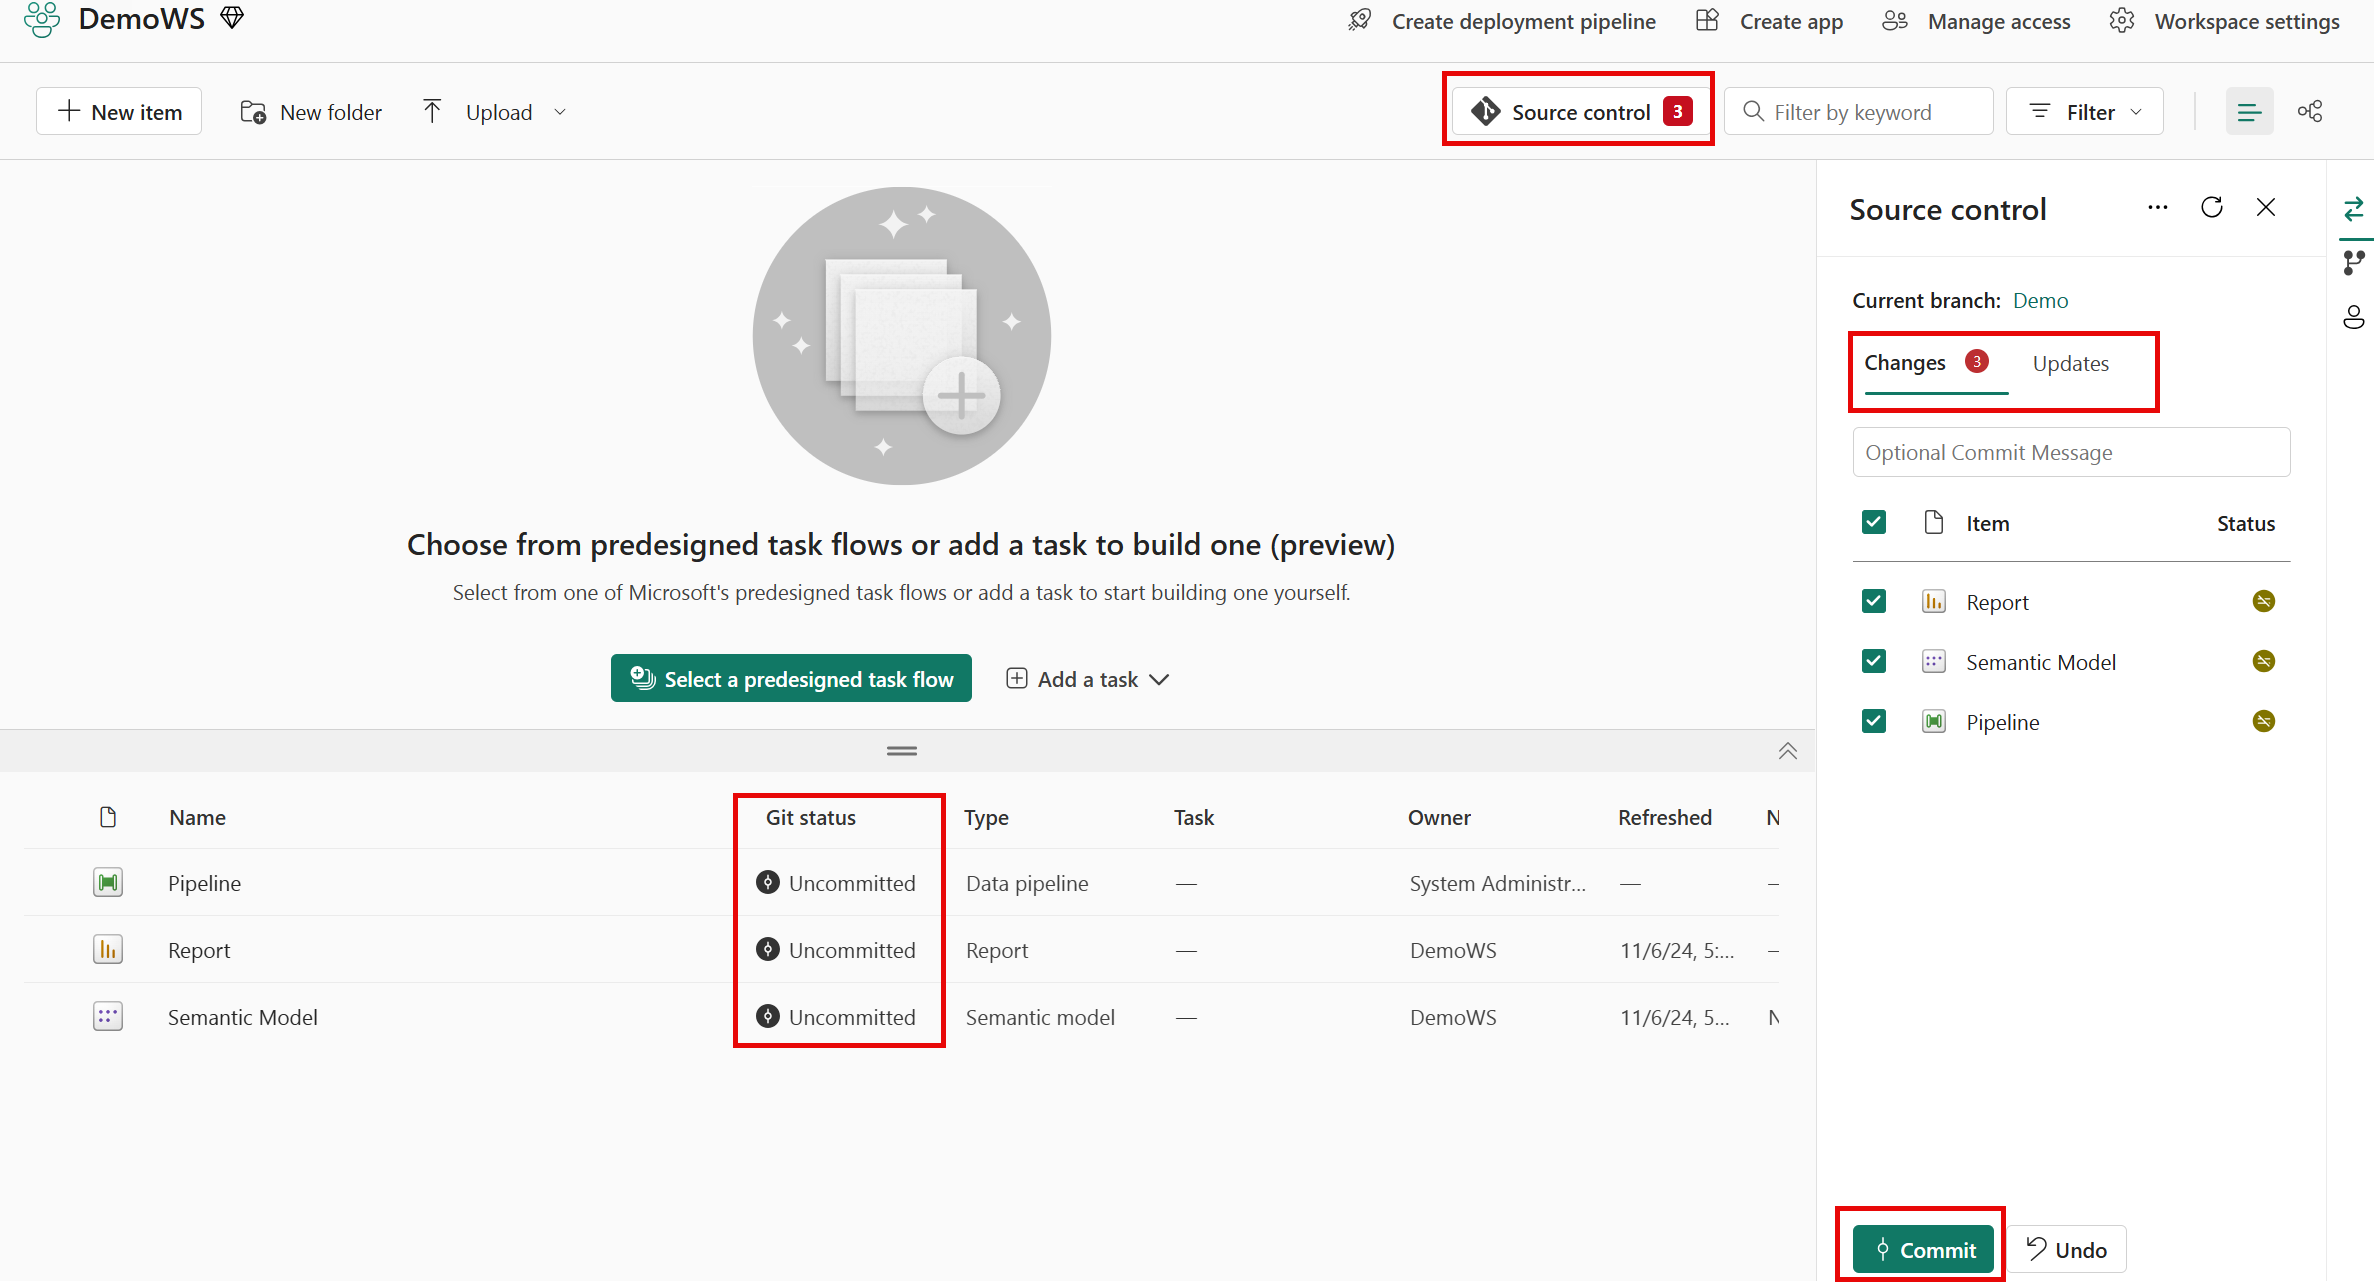
    After you connect to the repository, the workspace shows a Git status column indicating the sync state of items in the workspace, compared to the items in the remote branch.

    The source control icon shows the number of items that are different between the workspace and the repository.

    To synchronize the workspace and repository:

    • When you make workspace changes, synchronize them with the Git branch using the Changes selection in the Source control window.
    • When new commits are made in the Git branch, synchronize them with your workspace using the Updates selection in the Source control window.Screenshot of uncommitted changes in workspace.

    Branching scenarios

    Changes that you make to a workspace when you’re doing development work affect all other workspace users so it’s a best practice to work in isolation outside of shared workspaces. To keep your development work isolated from shared workspaces, you can develop using:

    • A separate, isolated workspace
    • Client tools like Power BI Desktop for reports and semantic models or VS Code for Notebooks.

    In both scenarios, your feature development work should take place in a dedicated branch instead of the main code branch. This makes it easy for multiple developers to work on a feature without affecting the main branch.

    Create a dedicated branch, issue pull requests and sync a workspace with Git

    Create a dedicated branch and issue pull requests to pull changes from your branch into the main branch by following these steps:

    For development using a separate, isolated workspace:

    1. Connect a development workspace to the main branch, following the instructions in the section on this page entitled “Connect to a Git Repository”.
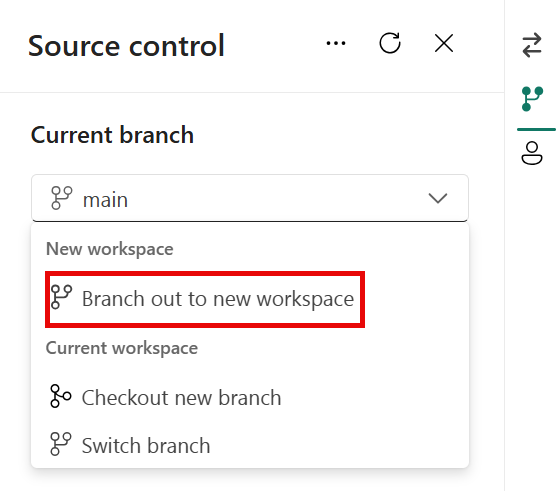
    2. If you’re a developer who works in the Fabric web interface, create an isolated branch for your work from the development workspace that’s connected to the main branch by selecting Source control and Branch out to new workspace. Name the branch and associate it with another workspace. The new workspace syncs with the new branch you create and become an isolated work environment for your work.Screenshot of creating new workspace and branch.
    3. Makes changes in your branch, then commit them to your isolated branch via the Source control interface in Fabric.
    4. Then, in Git, create a Pull Request (PR) to pull the changes from your isolated branch into the main branch.
    5. The main branch in Git will be updated once the PR is merged to the main branch. When you open the shared development workspace, you’ll be prompted to synchronize the new content from Git with the shared development workspace.

    When using client tools for development, the process is similar to that when developing in the Fabric web interface.

    1. Connect a development workspace to the main branch, following the instructions in the section on this page entitled “Connect a Fabric workspace to a Git repository”.
    2. Clone the repository on your local machine.
    3. Push the changes to the remote repository when you’re ready to test in Fabric. Test the changes by connecting your isolated branch to a separate workspace.
    4. Issue a PR in Git to merge your changes into the main branch.
    5. When you open the shared workspace associated with the main branch, you’ll be prompted to sync the changes from the repository into the workspace.

    https://cosmicnext.com/quote
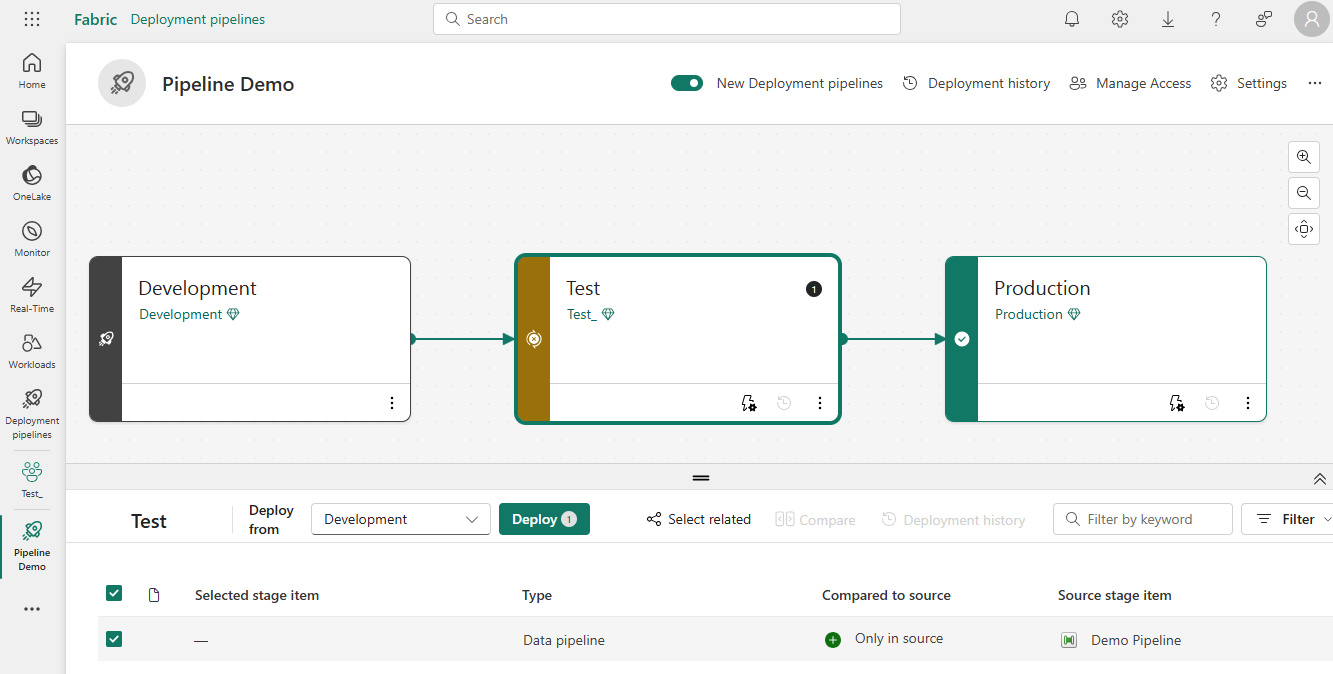
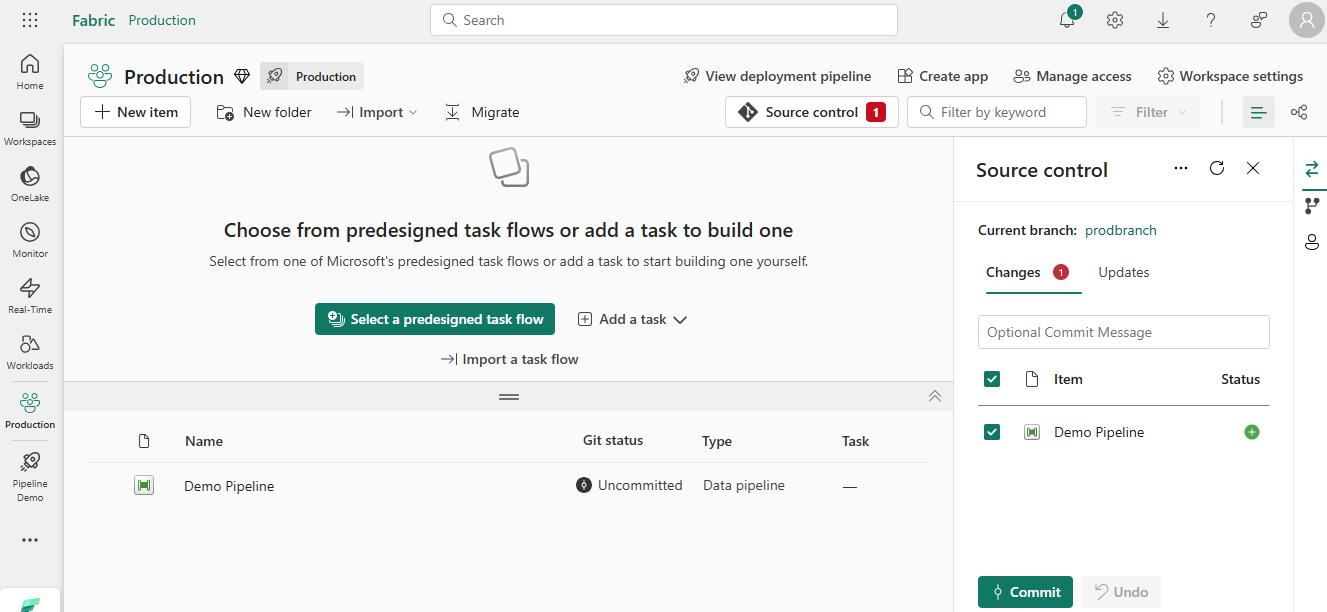
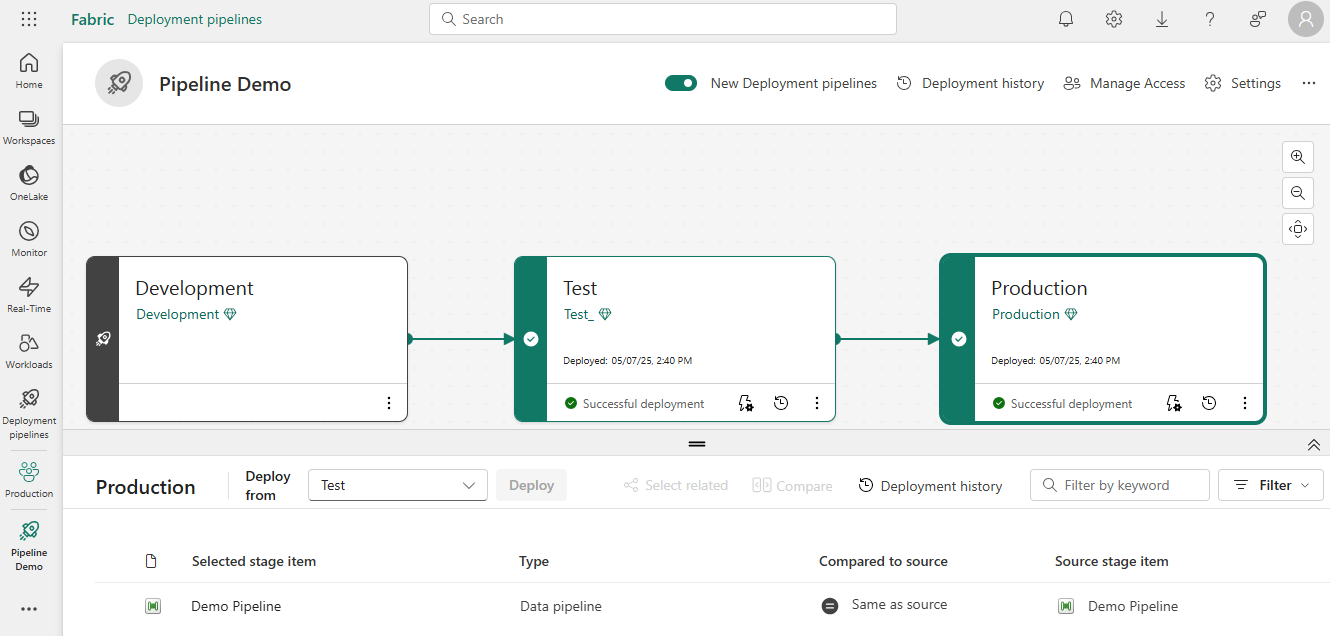
  • Understand Continuous Integration and Continuous Delivery (CI/CD)

    When you and members of your team are each responsible developing and maintaining different parts of your Fabric environment, a best practice is to work in isolated development environments until you’re ready to combine your development efforts and publish your changes to a particular pre-production environment. When you’re ready to publish your changes, you need to make sure that your changes don’t break existing code or interfere with changes made by other developers. There’s also a need to ensure that code changes are saved and can be reverted if there are issues. The built-in continuous integration and continuous delivery capabilities in Fabric can help facilitate this.

    Continuous integration and continuous delivery is a process for integrating code contributions from multiple developers into a main codebase. Contributions are frequently committed, and automated processes build and test the new code. Code is continuously moving into production, reducing feature development time.

    Continuous integration

    If developers work on separate code branches on their local machines for long periods of time and only merge their changes to the main codebase once their work is finished, this increases the likelihood of conflicts and bugs that might only be identified in later development stages and can slow down delivery of features to users.

    Continuous integration (CI) helps you avoid bugs and code failures and lets you continuously develop and release functionality. In CI, you frequently commit code to a shared code branch or trunk in a version control system and once it’s merged, changes are validated by a build process and automated testing. Conflicts between new and existing code are identified earlier in the development process and are easier and faster to fix.

    Continuous delivery

    Continuous delivery happens after continuous integration. Once CI is complete, code is deployed to a staging environment where more automated testing is performed before code is released into production.

    Continuous deployment

    Continuous deployment is a process that automatically releases updates into production environments through structured deployment stages, once they pass automated tests.

    Use CI/CD in Fabric

    Managing the lifecycle of Fabric items using CI/CD has two parts: integration and deployment. Integration is implemented using Git. Deployment is implemented using Fabric deployment pipelines. Automation of deployment or integration is implemented using Fabric REST APIs.

    • Git: Lets your team collaborate using branches, and provides version control. It helps you manage incremental code changes, and see code history.
    • Deployment pipelines: Lets you promote code changes to different environments like development, test, and production.
    • Fabric REST APIs: Enables automation and lets you programmatically manage CI/CD processes.

    https://cosmicnext.com/mobile-app-development

  • Inclusive AI with Copilot

    Microsoft Copilot is changing the way you approach everyday tasks, making them more accessible to everyone.

    In this video, you discover how Copilot helps reducing barriers, providing writing assistance, and summarizing information in seconds. Explore real-world instances where Copilot creates text from short prompts, suggests full sentences, and generates descriptions and summaries of online material.

    https://go.microsoft.com/fwlink/?linkid=2296201

    Copilot was created with inclusive design in mind. Its voice commands and text generation help make technology accessible and empowering for individuals with disabilities.

    https://cosmicnext.com/managed-it-services

  • AI as an ally for humanitarian action

    As our world undergoes rapid transformations and faces numerous complex challenges, the need for effective humanitarian action has never been more urgent. AI is at the forefront, offering solutions to aid people in need.

    In this video, you uncover the power of AI in addressing some of the most pressing challenges faced by communities worldwide. From predicting natural disasters to optimizing the distribution of resources, AI is enabling more effective and timely responses to crises.

    https://go.microsoft.com/fwlink/?linkid=2296400

    Recent AI advancements can help tackle some of the most pressing global challenges. As AI progresses, our capacity to address significant climate and humanitarian challenges enhances.

    https://cosmicnext.com/loyalty

  • Impact of AI in job roles

    As AI continues to evolve, it isn’t only transforming how you perform tasks but also creating entirely new roles and processes that were previously unimaginable.

    This video examines AI’s progress in sectors like finance, healthcare, energy, manufacturing, retail, public sector, and agriculture. It covers AI’s role in fraud detection in finance, improving patient care in healthcare, boosting energy efficiency, and personalizing retail experiences. By the end of the video, you’ll have a better understanding of how AI is transforming job roles and fostering growth and innovation.

    https://go.microsoft.com/fwlink/?linkid=2296301

    AI is transforming industries by introducing new roles and methodologies that boost efficiency and foster innovation. Whether in finance, healthcare, energy, manufacturing, retail, the public sector, or agriculture, AI is catalyzing advancements and propelling growth. As you explore this environment, it’s important to be an agile learner, prepared to adapt and enhance your skills. Using AI’s capabilities enables you to accomplish more and reshape your professional journey.

    https://cosmicnext.com/it-support

  • The impact of AI on accessibility

    Today, AI advancements make technology more accessible for everyone. These innovations are breaking down barriers and creating new opportunities for individuals with diverse abilities. AI is proving to be a catalyst for inclusivity, enabling people to access information, communicate, and participate in various aspects of life more easily. Through these efforts, technology is becoming a powerful ally for inclusiveness and accessibility.

    In this video, you explore the impact of AI on accessibility, highlighting how new initiatives are breaking down barriers and creating new opportunities for people with diverse abilities. The projects highlighted in this video demonstrate AI’s potential to enhance inclusivity, making it easier for individuals with disabilities to access information, communicate, and participate in various aspects of life.

    https://go.microsoft.com/fwlink/?linkid=2296300

    From enhancing braille literacy in India to transforming employment opportunities for neurodivergent individuals, AI is at the forefront of making our digital world more inclusive.

    https://cosmicnext.com/it-consulting

  • Automate actions

    Activator is a technology in Microsoft Fabric that enables automated processing of events that trigger actions. For example, you can use Activator to notify you by email when a value in an Eventstream deviates from a specific range or to run a notebook to perform some Spark-based data processing logic when a Real-Time Dashboard is updated.

    Screenshot of an Activator alert in Microsoft Fabric.

    This image shows a rule configured to alert when package delivery failures happen, demonstrating how you can automate responses to specific business events.

    Understand Activator key concepts

    Activator operates based on four core concepts: EventsObjectsProperties, and Rules.

    • Events - Each record in a stream of data represents an event that has occurred at a specific point in time.
    • Objects - The data in an event record can be used to represent an object, such as a sales order, a sensor, or some other business entity.
    • Properties – The fields in the event data can be mapped to properties of the business object, representing some aspect of its state. For example, a total_amount field might represent a sales order total, or a temperature field might represent the temperature measured by an environmental sensor.
    • Rules – The key to using Activator to automate actions based on events is to define rules that set conditions under which an action is triggered based on the property values of objects referenced in events. For example, you might define a rule that sends an email to a maintenance manager if the temperature measured by a sensor exceeds a specific threshold.

    Use cases for Activator

    Activator can help you in various scenarios, such as dynamic inventory management, real-time customer engagement, and effective resource allocation in cloud environments. It’s a powerful tool for any circumstance that requires real-time data analysis and automated actions.

    Use Activator to:

    • Initiate marketing actions when product sales drop.
    • Send notifications when temperature changes could affect perishable goods.
    • Flag real-time issues affecting the user experience on apps and websites.
    • Trigger alerts when a shipment hasn’t been updated within an expected time frame.
    • Send alerts when a customer’s account balance crosses a certain threshold.
    • Respond to anomalies or failures in data processing workflows immediately.
    • Run ads when same-store sales decline.
    • Alert store managers to move food from failing grocery store freezers before it spoils.

    https://cosmicnext.com/infrastructure-services

  • Visualize real-time data

    Real-Time Dashboards provide a way to pin data visualizations to a single visual interface, enabling you to surface real-time insights at a glance. Each tile in a dashboard shows you different information based on a KQL query that extracts real-time data from tables in an eventhouse.

    Screenshot of a real-time dashboard in Microsoft Fabric.

    Create a Real-Time Dashboard

    You can create a Real-Time Dashboard in a workspace and then configure its source, or you can create one directly from a KQL queryset in an eventhouse.

    Dashboards are composed of one or more tiles, each containing a visualization based on a KQL query expression. By default, the visualization shows the results of the query as a table; but you can edit the tile to customize how the data is displayed.

    When published, tiles let you explore the data they contain interactively by drilling into the data and using a visual interface to filter and aggregate the data, and change the visualization type.

     Tip

    To learn more about Real-Time Dashboards, see Create a Real-Time Dashboard.

    Visualize real-time data with Power BI

    You also can create Power BI reports from your KQL database data.

    Screenshot of a Power BI report editor in Microsoft Fabric.

     https://cosmicnext.com