In the previous unit, you learned how to persist data to an in-memory database. Persisting data to an in-memory database is useful in development. But, because all data is lost when the application is restarted, it isn’t suitable for production. In production, you should persist data to a database like SQL Server, MySQL, PostgreSQL, or SQLite.
Database providers abstract database access from the application code
One of the benefits of performing database access through an abstraction layer like Entity Framework (EF) Core is that it decouples your application from the database provider. You can change the database provider without rewriting your database access code. You shouldn’t expect to be able to switch database providers without any effect to your application code, but the changes will be minimized and localized.
A related advantage of using EF Core is that you can reuse your code, experience, and data access libraries to work with any other EF Core database provider.
For this tutorial, you’ll use SQLite database, but you might also use one that works better for you. EF Core currently supports more than 20 Database Providers.
Steps to add a new database provider
In general, you’ll use the following steps to implement a new database provider:
Add one or more NuGet packages to your project to include the database provider.
Configure the database connection.
Configure the database provider in the ASP.NET Core services.
Perform database migrations.
In the next unit, you’ll walk through the steps to add the SQLite database provider. Similar steps will apply for other database providers.
Most nontrivial web applications need to reliably run operations on data, such as create, read, update, and delete (CRUD). They also need to persist any changes made by these operations between application restarts. Although there are various options for persisting data in .NET applications, Entity Framework (EF) Core is a user-friendly solution and a great fit for many .NET applications.
Understand EF Core
EF Core is a lightweight, extensible, open source, and cross-platform data access technology for .NET applications.
EF Core can serve as an object-relational mapper, which:
Enables .NET developers to work with a database by using .NET objects.
Eliminates the need for most of the data-access code that typically needs to be written.
EF Core supports a large number of popular databases, including SQLite, MySQL, PostgreSQL, Oracle, and Microsoft SQL Server.
The model
With EF Core, data access is performed by using a model. A model is made up of entity classes and a context object that represents a session with the database. The context object allows querying and saving data.
The entity class
In this scenario, you’re implementing a pizza store management API, so you use a Pizza entity class. The pizzas in your store have a name and a description. They also need an ID to allow the API and database to identify them. The Pizza entity class that you use in your application identifies pizzas:
C#Copy
namespace PizzaStore.Models
{
  public class Pizza
  {
      public int Id { get; set; }
      public string? Name { get; set; }
      public string? Description { get; set; }
  }
}
The context class
This application has only one entity class, but most applications have multiple entity classes. The context class is responsible for querying and saving data to your entity classes, and for creating and managing the database connection.
Perform CRUD operations with EF Core
After EF Core is configured, you can use it to perform CRUD operations on your entity classes. Then, you can develop against C# classes, delegating the database operations to the context class. Database providers in turn translate it to database-specific query language. An example is SQL for a relational database. Queries are always executed against the database, even if the entities returned in the result already exist in the context.
Query data
The context object exposes a collection class for each entity type. In the preceding example, the context class exposes a collection of Pizza objects as Pizzas. Given that we have an instance of the context class, you can query the database for all pizzas:
C#Copy
var pizzas = await db.Pizzas.ToListAsync();
Insert data
You can use the same context object to insert a new pizza:
C#Copy
await db.pizzas.AddAsync(
    new Pizza { ID = 1, Name = "Pepperoni", Description = "The classic pepperoni pizza" });
Delete data
Delete operations are simple. They require only an ID of the item to be deleted:
C#Copy
var pizza = await db.pizzas.FindAsync(id);
if (pizza is null)
{
    //Handle error
}
db.pizzas.Remove(pizza);
Update data
Similarly, you can update an existing pizza:
C#Copy
int id = 1;
var updatepizza = new Pizza { Name = "Pineapple", Description = "Ummmm?" };
var pizza = await db.pizzas.FindAsync(id);
if (pizza is null)
{
    //Handle error
}
pizza.Description = updatepizza.Description;
pizza.Name = updatepizza.Name;
await db.SaveChangesAsync();
Use the EF Core in-memory database
EF Core includes an in-memory database provider that can be used to test your application. The in-memory database provider is useful for testing and development, but it shouldn’t be used in production. In the next unit, you’ll use the in-memory database provider to create a database and perform CRUD operations on it.
Coding an app with ASP.NET Core is different from designing a static website with HTML, CSS, and JavaScript. A static website can be deployed to any web server that supports static files. The web server doesn’t need to process static files; it simply serves them over HTTP. When a web browser requests a resource, the web server simply sends the file back to the browser.
An ASP.NET Core app, on the other hand, is a dynamic web application. It runs as a program on the web server. When the user’s web browser sends a request to the web server, the web server runs the app to generate a response, and then the web server sends the response back to the browser.
Publishing a .NET app is the process of preparing the app for deployment on a server. When you publish a .NET app, you package your app and its dependencies into a folder that can be easily deployed. The published app doesn’t include any source code files, but it does include all the files needed to run the app, including the compiled assemblies (DLLs), configuration files, and any other assets your app needs. The app can then be deployed to a web server, cloud service, or other hosting environment.
Types of deployments
When you publish a .NET app, you can choose between two different types of deployments: framework-dependent and self-contained. The type of deployment you choose affects how your app is packaged and deployed.
Framework-dependent deployment
A framework-dependent deployment includes only your app’s files and dependencies. It doesn’t include the .NET runtime. Instead, the target machine must have the .NET runtime installed in order to run the app. This type of deployment is the default for .NET apps.
Self-contained deployment
A self-contained deployment includes your app’s files, dependencies, and the .NET runtime. The .NET runtime is included with the app, so the target machine doesn’t need to have the .NET runtime installed in order to run the app. Including the runtime makes self-contained deployments larger than framework-dependent deployments, but it also makes them more portable. It also makes it easier to run multiple versions of the .NET runtime side by side on the same machine.
Choosing a deployment type
The deployment type you choose depends on your app’s requirements and the target environment. Consider the following factors when choosing a deployment type:
Deployment Type
Advantages
Disadvantages
Framework-dependent
Smaller deployment size
Faster deployment times
Uses the .NET runtime installed on the target machine, regardless of operating system
Requires the .NET runtime to be installed on the target machine
Requires managing the .NET runtime versions installed on the target machine
Self-contained
No need to install .NET runtime on the target machine
Easier to run multiple versions of .NET side by side
Larger deployment size
Slower deployment times
.NET runtime updates must be deployed with the app
Where to deploy your app
Once you’ve published your app, you can deploy it to any environment that supports ASP.NET Core. Here are a few options:
Kestrel
By default, ASP.NET Core apps run in ASP.NET Core’s built-in web server, Kestrel. Kestrel is cross-platform and tuned for high performance. It supports all modern web server features, including HTTPS, HTTP/2, HTTP/3, and WebSockets. It’s also customizable and extensible, so you can configure it to meet your app’s needs. Kestrel is the recommended web server for ASP.NET Core apps.
Since Kestrel is built into ASP.NET Core, you can deploy your app to any machine capable of running .NET, including Windows, macOS, and Linux. Kestrel works great by itself, but apps running on Kestrel are often deployed behind a reverse proxy server, such as Internet Information Services (IIS), Nginx, or Apache. The reverse proxy server handles incoming requests from the internet and forwards them to Kestrel. This allows you to take advantage of the reverse proxy server’s features, such as load balancing, caching, and SSL termination.
Internet Information Services (IIS)
If you’re deploying to Windows, you can host your ASP.NET Core app in IIS. To do this, you need to install the ASP.NET Core Module for IIS. The module forwards requests from IIS to Kestrel, which runs your app. This allows you to take advantage of IIS’s features, such as process management, logging, and security.
Containers
If you’re deploying to a containerized environment, you can package your ASP.NET Core app as a Docker container. This allows you to run your app in any container runtime that supports Docker, such as Docker Desktop, Docker Enterprise, or Kubernetes. Containers are portable and scalable, so you can run your app on any machine that supports Docker, regardless of the underlying operating system.
Azure
If you’re deploying to Azure, you can host your ASP.NET Core app in Azure App Service or Azure Container Apps. Various tools make it easy to deploy your app to Azure from the command line. These tools include:
Razor is a markup syntax for embedding .NET based code into webpages. The Razor syntax consists of Razor markup, C#, and HTML. Razor syntax is similar to the templating engines of various JavaScript single-page application (SPA) frameworks, such as Angular, React, VueJs, and Svelte.
The default Razor language is HTML. Rendering HTML from Razor markup is no different than rendering HTML from an HTML file. The server renders HTML markup in .cshtml Razor files unchanged.
Razor syntax
Razor supports C# and uses the @ symbol to transition from HTML to C#. Razor evaluates C# expressions and renders them in the HTML output.
When an @ symbol is followed by a Razor reserved keyword, it transitions into Razor-specific markup. Otherwise, it transitions into plain HTML. To escape an @ symbol in Razor markup, use a second @ symbol. The following code sample would render the value of @Username in the HTML output.
Syntax
Output
<p>@Username</p>
Renders the value of @Username in the HTML output.
<p>@@Username</p>
Renders “@Username” in the HTML output.
HTML attributes and content containing email addresses don’t treat the @ symbol as a transition character. For example, the email addresses in the following code are untouched by Razor parsing:
The following code examples show how the @ character can be used to implement inline expressions, single statement blocks, and multi-statement blocks:
HTMLCopy
<!-- Single statement blocks  -->
@{ var myMessage = "Hello World"; }

<!-- Inline expressions -->
<p>The value of myMessage is: @myMessage</p>

<!-- Multi-statement block -->
@{
    var greeting = "Welcome to our site!";
    var weekDay = DateTime.Now.DayOfWeek;
    var greetingMessage = greeting + " Today is: " + weekDay;
}
<p>The greeting is: @greetingMessage</p>
The following code sample shows how to use a combination of .NET code and HTML to create the body of a table from a data model. The @foreachstatement iterates through the Model.FruitModels data model and generates a table row containing the fruit name and if it’s available.
razorCopy
@* Code is truncated for readability. *@
<tbody>
    @foreach (var obj in _fruitList ?? [])
    {
        <tr>
            <td>@obj.name</td>
            <td>@obj.instock</td>
        </tr>
    }
</tbody>
Swashbuckle is a NuGet package that provides a way to automatically generate Swagger documentation for ASP.NET Web API projects. Swagger is a tool that helps developers design, build, document, and consume RESTful APIs. With Swashbuckle, you can easily add Swagger documentation to your Web API project by annotating your code with attributes that describe your API endpoints, parameters, and responses. Swashbuckle then uses this information to generate a Swagger JSON file, which can be used to generate interactive API documentation, client SDKs, and more.
There are three main components to Swashbuckle:
Swashbuckle.AspNetCore.Swagger: a Swagger object model and middleware to expose SwaggerDocument objects as JSON endpoints.
Swashbuckle.AspNetCore.SwaggerGen: a Swagger generator that builds SwaggerDocument objects directly from your routes, controllers, and models. It’s typically combined with the Swagger endpoint middleware to automatically expose Swagger JSON.
Swashbuckle.AspNetCore.SwaggerUI: an embedded version of the Swagger UI tool. It interprets Swagger JSON to build a rich, customizable experience for describing the web API functionality. It includes built-in test harnesses for the public methods.
In this unit, you learn how to use the IHttpClientFactory to handle the HTTP client creation and disposal, and to use that client to perform REST operations in an ASP.NET Blazor Web app. The code samples used throughout this unit are based on interacting with an API that enables managing a list of fruit stored in a database. The information in this unit is based on using code-behind files in a Razor app.
The following code represents the data model that is referenced in the code examples:
C#Copy
public class FruitModel
{
    // An id assigned by the database
    public int id { get; set; }
    // The name of the fruit
    public string? name { get; set; }
    // A boolean to indicate if the fruit is in stock
    public bool instock { get; set; }
}
Register IHttpClientFactory in your app
To add IHttpClientFactory to your app, register AddHttpClient in the Program.cs file. The following code example uses the named client type and sets the base address of the API used in REST operations, and is referenced throughout the rest of this unit.
C#Copy
// Add services to the container.
builder.Services.AddRazorComponents()
    .AddInteractiveServerComponents();

// Add IHttpClientFactory to the container and set the name of the factory
// to "FruitAPI". The base address for API requests is also set.
builder.Services.AddHttpClient("FruitAPI", httpClient =>
{
    httpClient.BaseAddress = new Uri("http://localhost:5050/");
});

var app = builder.Build();
Identify the operation requirements in the API
Before performing operations with an API, you need to identify what the API is expecting:
API endpoint: Identify the endpoint for the operation so you can properly adjust the URI stored in the base address if needed.
Data requirements: Identify if the operation is returning/expecting an enumerable or just a single piece of data.
Note
The code samples throughout the rest of this unit assume each HTTP operation is handled on a separate page in the solution.
Perform a GET operation
A GET operation shouldn’t send a body and is used (as the method name indicates) to retrieve data from a resource. To perform an HTTP GET operation, given an HttpClient and a URI, use the HttpClient.GetAsync method. For example, if you wanted to create a table on a Razor Page app’s home page (Home.razor) to display the results of a GET operation you need to add the following to the code-behind (Home.razor.cs):
Use dependency injection to add the IHttpClientFactory to the page model.
Create an instance of the HttpClient
Perform the GEToperation and deserialize the results into your data model.
The following code example shows how to perform a GET operation. Be sure to read the comments in the code.
C#Copy
public partial class Home : ComponentBase
{
    // IHttpClientFactory set using dependency injection
    [Inject]
    public required IHttpClientFactory HttpClientFactory { get; set; }

    [Inject]
    private NavigationManager? NavigationManager { get; set; }

    /* Add the data model, an array is expected as a response */
    private IEnumerable<FruitModel>? _fruitList;

    // Begin GET operation when the component is initialized
    protected override async Task OnInitializedAsync()
    {
        // Create the HTTP client using the FruitAPI named factory
        var httpClient = HttpClientFactory.CreateClient("FruitAPI");

        // Perform the GET request and store the response. The parameter
        // in GetAsync specifies the endpoint in the API
        using HttpResponseMessage response = await httpClient.GetAsync("/fruits");

        // If the request is successful deserialize the results into the data model
        if (response.IsSuccessStatusCode)
        {
            using var contentStream = await response.Content.ReadAsStreamAsync();
            _fruitList = await JsonSerializer.DeserializeAsync<IEnumerable<FruitModel>>(contentStream);
        }
        else
        {
            // If the request is unsuccessful, log the error message
            Console.WriteLine($"Failed to load fruit list. Status code: {response.StatusCode}");
        }
    }
}
Perform a POST operation
A POST operation should send a body and is used to add data to a resource. To perform an HTTP POST operation, given an HttpClient and a URI, use the HttpClient.PostAsync method. If you want to use a form to add items to the data on your home page you need to:
Use dependency injection to add the IHttpClientFactory to the page model.
Bind the data to the form using either the EditForm or EditContext model.
Serialize the data you want to add using the JsonSerializer.Serialize method.
The Hypertext Transfer Protocol (or HTTP) is used to request resources from a web server. Many types of resources are available on the web, and HTTP defines a set of request methods for accessing these resources. In .NET Core, those requests are made through an instance of the HttpClient.
There are two options for implementing HttpClient in your app and the recommendation is to choose the implementation based on the clients lifetime management needs:
Long-lived clients: create a static or singleton instance using the HttpClient class and set PooledConnectionLifetime
Short-lived clients: use clients created by IHttpClientFactory
Implement with the HttpClient class
The System.Net.Http.HttpClient class sends HTTP requests and receives HTTP responses from a resource identified by a URI. An HttpClient instance is a collection of settings applied to all requests executed by that instance, and each instance uses its own connection pool, which isolates its requests from others. Beginning with .NET Core 2.1, the SocketsHttpHandler class provides the implementation, making behavior consistent across all platforms.
HttpClient only resolves DNS entries when a connection is created. It doesn’t track time to live (TTL) durations specified by the DNS server. If DNS entries change regularly the client is unaware those updates. To solve this issue, you can limit the lifetime of the connection by setting the PooledConnectionLifetime property, so that DNS lookup is repeated when the connection is replaced.
In the following example, HttpClient is configured to reuse connections for 15 minutes. After the TimeSpan specified by PooledConnectionLifetime elapses, the connection is closed and a new one is created.
C#Copy
var handler = new SocketsHttpHandler
{
    PooledConnectionLifetime = TimeSpan.FromMinutes(15) // Recreate every 15 minutes
};
var sharedClient = new HttpClient(handler);
Implement with IHttpClientFactory
The IHttpClientFactory serves as a factory abstraction that can create HttpClient instances with custom configurations. IHttpClientFactory was introduced in .NET Core 2.1. Common HTTP-based .NET workloads can take advantage of middleware with ease.
When you call any of the AddHttpClient extension methods, you’re adding the IHttpClientFactory and related services to the IServiceCollection. The IHttpClientFactory type offers the following benefits:
Exposes the HttpClient class as a dependency injection-ready type.
Provides a central location for naming and configuring logical HttpClient instances.
Codifies the concept of outgoing middleware via delegating handlers in HttpClient.
Provides extension methods for Polly based middleware to take advantage of delegating handlers in HttpClient.
Manages the caching and lifetime of underlying HttpClientHandler instances. Automatic management avoids common Domain Name System (DNS) problems that occur when manually managing HttpClient lifetimes.
Adds a configurable logging experience for all requests sent through clients created by the factory.
You should let HttpClientFactory and the framework manage the lifetimes and instantiation of HttpClient instances. The lifetime management helps avoid common issues such as DNS (Domain Name System) problems that can occur when manually managing HttpClient lifetimes.
There are several ways IHttpClientFactory can be used in an app:
When you register a service, you must choose a lifetime that matches how the service is used in the app. The lifetime affects how the service behaves when it’s injected into components. So far, you’ve registered services using the AddSingleton method. This method registers a service with a singleton lifetime. There are three built-in lifetimes for services in ASP.NET Core:
Singleton
Scoped
Transient
Singleton lifetime
Services registered with a singleton lifetime are created once when the app starts and are reused for the lifetime of the app. This lifetime is useful for services that are expensive to create or that don’t change often. For example, a service that reads configuration settings from a file can be registered as a singleton.
Use the AddSingleton method to add a singleton service to the service container.
Scoped lifetime
Services registered with a scoped lifetime are created once per configured scope, which ASP.NET Core sets up for each request. A scoped service in ASP.NET Core is typically created when a request is received and disposed of when the request is completed. This lifetime is useful for services that access request-specific data. For example, a service that fetches a customer’s data from a database can be registered as a scoped service.
Use the AddScoped method to add a scoped service to the service container.
Transient lifetime
Services registered with a transient lifetime are created each time they’re requested. This lifetime is useful for lightweight, stateless services. For example, a service that performs a specialized calculation can be registered as a transient service.
Use the AddTransient method to add a transient service to the service container.
Services that depend on other services
A service can depend on other services, typically by having its dependencies injected through its constructor. When you register a service that depends on another service, you must take service lifetime into account. For example, a singleton services shouldn’t depend on a scoped service because the scoped service is disposed of when the request is completed but a singleton lives for the lifetime of the app. Fortunately, ASP.NET Core will by default check for this misconfiguration and will report a scope validation error when the app starts up so the issue can be quickly identified and addressed.
ASP.NET Core apps often need to access the same services across multiple components. For example, several components might need to access a service that fetches data from a database. ASP.NET Core uses a built-in dependency injection (DI) container to manage the services that an app uses.
Dependency injection and Inversion of Control (IoC)
The dependency injection pattern is a form of Inversion of Control (IoC). In the dependency injection pattern, a component receives its dependencies from external sources rather than creating them itself. This pattern decouples the code from the dependency, which makes code easier to test and maintain.
Consider the following Program.cs file:
C#Copy
using Microsoft.AspNetCore.Builder;
using Microsoft.AspNetCore.Http;
using Microsoft.Extensions.DependencyInjection;
using MyApp.Services;

var builder = WebApplication.CreateBuilder(args);

builder.Services.AddSingleton<PersonService>();
var app = builder.Build();

app.MapGet("/",
    (PersonService personService) =>
    {
        return $"Hello, {personService.GetPersonName()}!";
    }
);

app.Run();
And the following PersonService.cs file:
C#Copy
namespace MyApp.Services;

public class PersonService
{
    public string GetPersonName()
    {
        return "John Doe";
    }
}
To understand the code, start with the highlighted app.MapGet code. This code maps HTTP GET requests for the root URL (/) to a delegate that returns a greeting message. The delegate’s signature defines an PersonService parameter named personService. When the app runs and a client requests the root URL, the code inside the delegate depends on the PersonService service to get some text to include in the greeting message.
Where does the delegate get the PersonService service? It’s implicitly provided by the service container. The highlighted builder.Services.AddSingleton<PersonService>() line tells the service container to create a new instance of the PersonService class when the app starts, and to provide that instance to any component that needs it.
Any component that needs the PersonService service can declare a parameter of type PersonService in its delegate signature. The service container will automatically provide an instance of the PersonService class when the component is created. The delegate doesn’t create the PersonService instance itself, it just uses the instance that the service container provides.
Interfaces and dependency injection
To avoid dependencies on a specific service implementation, you can instead.
The Azure infrastructure used to run Azure Web Apps in Windows isn’t the same as for Linux apps, and log files aren’t stored in the same locations.
Windows app log files
For Windows apps, file system log files are stored in a virtual drive that is associated with your Web App. This drive is addressable as D:\Home, and includes a LogFiles folder; within this folder are one or more subfolders:
Application – Contains application-generated messages, if File System application logging is enabled.
DetailedErrors – Contains detailed Web server error logs, if Detailed error messages are enabled.
http – Contains IIS-level logs, if Web server logging is enabled.
W3SVC<number> – Contains details of all failed http requests, if Failed request tracing is enabled.
Where storage to a Blob container is enabled, logs are stored in year, month, date, and hour folders, for example:Copy
2019
  01
   10
    08 - log entries for the period 08:00:00 to 08:59:59 on January 10th 2019
    09 - log entries for the period 09:00:00 to 09:59:59 on January 10th 2019
Within the hour folder, there are one or more CSV files containing messages saved within that 60-minute period.
Linux app log files
For Linux Web Apps, the Azure tools currently support fewer logging options than for Windows apps. Redirections to STDERR and STDOUT are managed through the underlying Docker container that runs the app, and these messages are stored in Docker log files. To see messages logged by underlying processes, such as Apache, you need to open an SSH connection to the Docker container.
Methods for retrieving log files
How you retrieve log files depends on the type of log file, and on your preferred environment. For file system logs, you can use the Azure CLI or the Kudu console. Kudu is the engine behind many features in Azure App Service related to source control based deployment.
Azure CLI
To download file system log files using the Azure CLI, first copy the log files from the app’s file system to Cloud Shell storage, and then run the following command.
Azure CLICopy
az webapp log download --log-file \<_filename_\>.zip --resource-group \<_resource group name_\> --name \<_app name_\>
To download the zipped log files to your local computer, use the file download and upload tool in the Cloud Shell toolbar. Once downloaded, the files are ready for opening in Microsoft Excel, or other apps.
Note
The Azure CLI download includes all app logs, except for failed request traces.
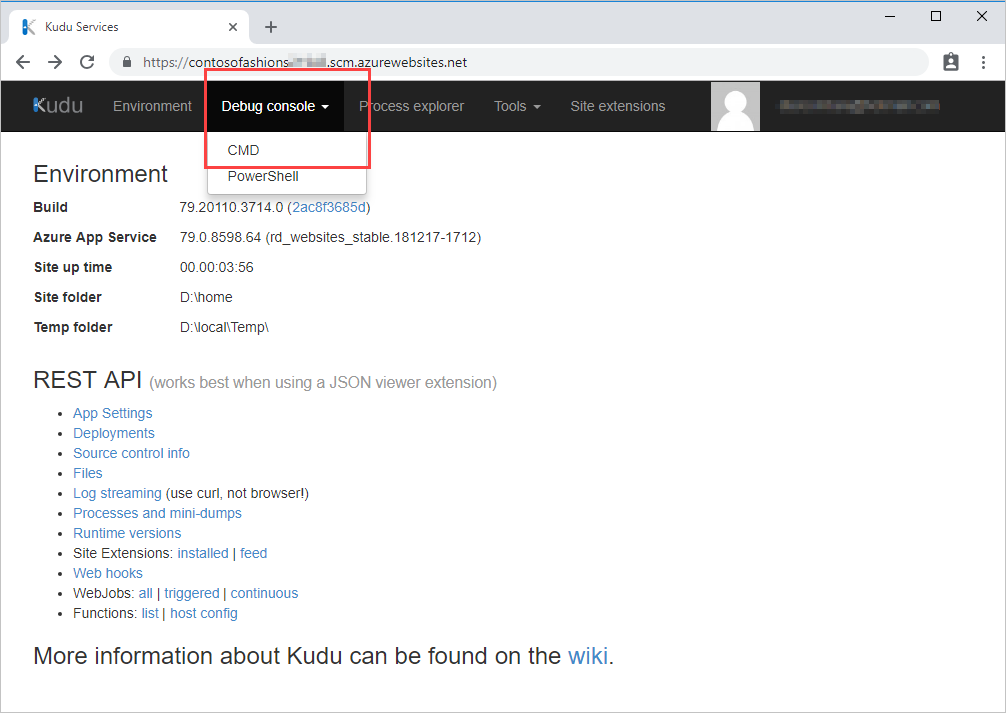
Kudu
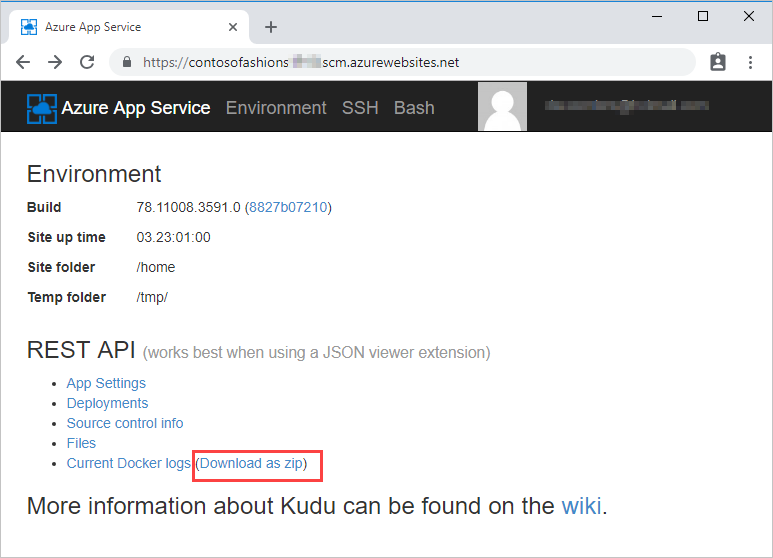
There’s an associated Source Control Management (SCM) service site associated with all Azure Web Apps. This site runs the Kudu service, and other Site Extensions. It’s Kudu that manages deployment and troubleshooting for Azure Web Apps, including options for viewing and downloading log files. The specific functionality available in Kudu, and how you download logs, depends on the type of Web App. For Windows apps, you can browse to the log file location, and then download the logs. For Linux apps, there might be a download link.
One way to access the Kudu console is to navigate to https://<app name>.scm.azurewebsites.net, and then sign in using deployment credentials.
You can also access Kudu from the Azure portal. On the App Service menu, under Development Tools, select Advanced Tools, and then on the Advanced Tools pane, select Go to open a new Kudu Services tab.
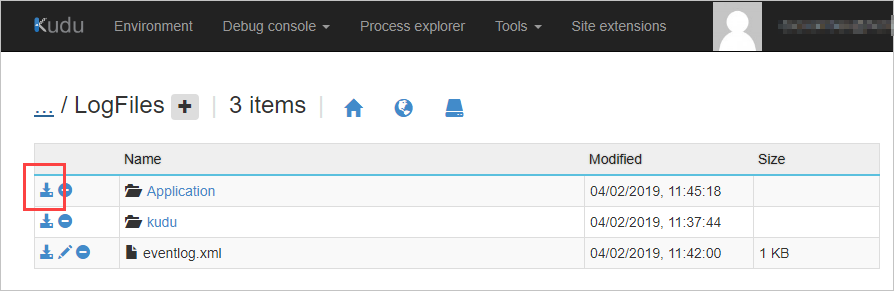
To download the log files from Windows apps:
Select Debug Console, and then select CMD.
In the file explorer section, select LogFiles, and for the Application folder, select Download. The logs are downloaded to your computer as Application.zip.For Linux apps, select the download link on the Environment page.
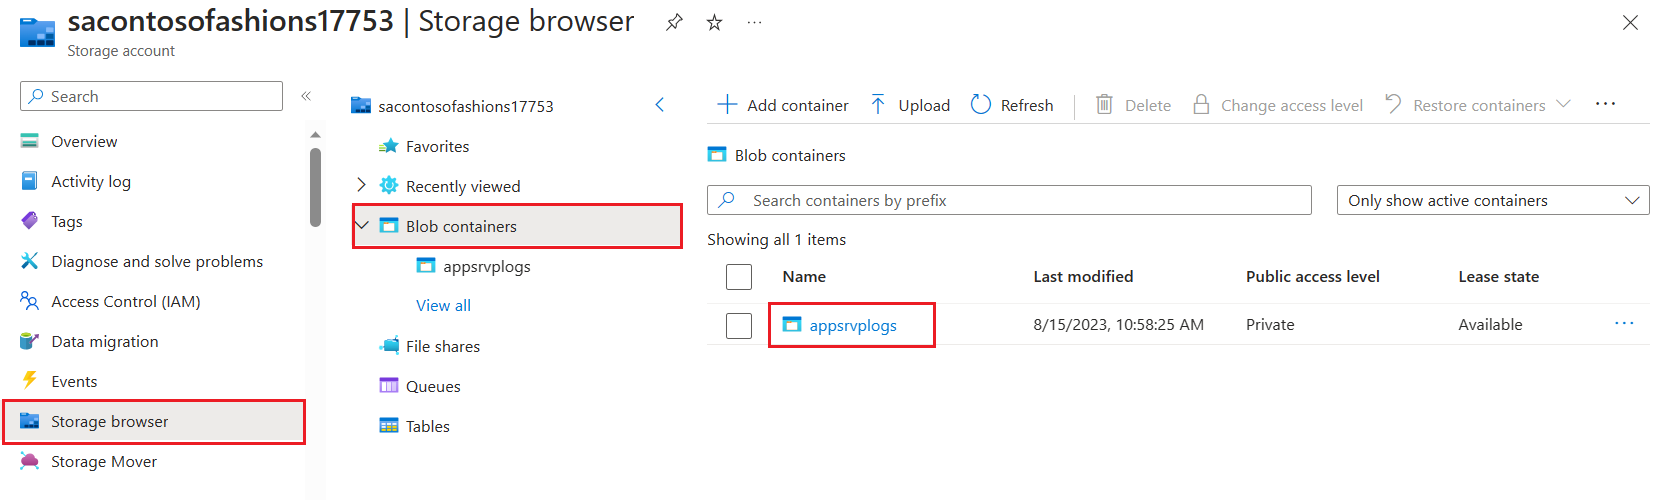
Azure Storage browser
To access Windows logs saved to an Azure Blob Storage container, you can use the Azure portal. To view and download the contents of the log file container, select Storage accounts from the portal menu. Select your storage account and then select Storage browser. Open the type of storage container (for example, Blob containers), and select the name of the blob container that contains the log file. Inside the container, open the relevant year, month, date, and hour folder, then double-click a CSV file to download it to your computer.
If you have Microsoft Excel on your computer, the log file automatically opens as an Excel worksheet. Otherwise, you can open the file using a text editor, such as Notepad.
 For Linux apps, select the download link on the Environment page.